• Need Help? Request A Quote
Simplified IT Services for Aussie Businesses
  • Services
    • Business Analysis
    • System and Tools
    • Web Development
    • Web Hosting Services
    • Domains
    • Business Emails
    • Branding Portfolio
  • Business Solutions
    • Art & Creativity
    • Beauty and Nail Salons
    • Charity & Non-profits
    • Corporate Portfolios
    • Fashion & Lifestyle
    • Gyms & Fitness
    • Landing Pages & Forms
    • Medical Clinics
    • Online Store
    • Professional Service Providers
    • Real Estate & Listing Sites
    • Restaurants & Hospitality
    • Social & NDIS Services
    • Weddings & Event Managers
  • Store
    • Domain
    • Hosting
  • Insights
    • Articles
  • About Us
  • Contact
  • Have any Questions?

    Book a Consultation

How to Activate Your PayPal Account on Your WordPress Website in 5 Simple Steps - Simplified IT Services for Aussie Businesses

    Home / How-to / How to Activate Your PayPal Account on Your WordPress Website in 5 Simple Steps
  • October 15, 2024
  • mahedi

How to Activate Your PayPal Account on Your WordPress Website in 5 Simple Steps

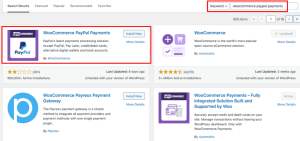
1. Ensure PayPal Plugin is Installed

  • If the PayPal plugin is already installed (your client may have this done), ensure it is activated.
  • Go to the Plugins section in the WordPress dashboard.
  • Locate the PayPal plugin (e.g., “WooCommerce PayPal Payments”) and click Activate if it’s not already activated.

2. Set Up a PayPal Business Account

(If you already have a PayPal account, skip to step 3)

  • Visit PayPal’s website and sign up for a Business Account.
  • Complete the sign-up process with your business details.

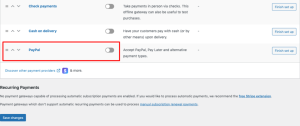
3. Configure PayPal in WordPress

  • In the WordPress dashboard, go to WooCommerce > Settings (or the plugin’s payment settings if not using WooCommerce).
  • Click on the Payments tab and locate PayPal.
  • Click Manage next to PayPal.
  • To link your PayPal account, log into your PayPal Business account, navigate to Account Settings > API Access > NVP/SOAP API Integration (Classic).
  • Click Manage API credentials, and get your API Username, API Password, and Signature.
  • Paste these credentials into the respective fields in your WordPress PayPal settings.


4. Optional: Test the Payment Gateway

  • To ensure the integration works correctly, you can enable Sandbox Mode (optional but recommended).
  • Use PayPal’s sandbox testing environment to simulate payments.
  • Once testing is complete, disable Sandbox Mode and ensure Live Mode is activated.

5. Save Changes and Activate PayPal

  • After configuration, click Save Changes.
  • Your PayPal payment gateway is now active, and customers can begin making payments through PayPal on your website.
Previous Post
Next Post

Recent Post

  • October 15, 2024
    How to Activate Your Epos Now Account on Your WordPress Website in 5 Simple Steps
  • October 15, 2024
    How to Activate Your PayPal Account on Your WordPress Website in 5 Simple Steps
  • October 15, 2024
    How to Activate Your Stripe Account on Your WordPress Website in 5 Simple Steps

Categories

  • All Articles
  • Design
  • Develop
  • Finance
  • How-to
  • Optmise
  • Promote
  • Tech

Tags

payment

Simplified IT Services for Aussie Businesses

We're here to help you define your company's mission and then equip it with the technology tools that will get jobs done.

Quick Links

  • Business Solutions
  • Request Quote
  • Book An Appointment
  • SEO Audit
  • Resources
  • Career
  • Contact

Services

  • Business Analysis
  • Business Emails
  • Domains
  • Systems & Tools
  • SEO
  • Web Development
  • Web Hosting Services

Have any Questions?

  • Book a consultation
  • 300 George Street
    Sydney, 2000
  • Seven Hills, NSW 2147
  • +61-2-80051233
  • hello@54.236.72.209

Partnered with:

Australian Computer Society

© Copyright 2022. All Rights Reserved by Sylvex Studio

  • Career
  • Terms & conditions
  • Privacy Policy
  • Submit Ticket
  • My Tickets